はじめに
2013年12月1日にリリースされたCentOS 6.5をVagrantでBox化しようとして、少しばかりハマりましたので、健忘録として記載します。

2013年12月21日 21時49分
2013年12月1日にリリースされたCentOS 6.5をVagrantでBox化しようとして、少しばかりハマりましたので、健忘録として記載します。
作業の前提条件は、下記のとおりです。
| ソフトウエア | バージョン |
|---|---|
| OS | Windows 7 Ultimate 32bit |
| Cygwin | Setup Version 2.831 |
| VirtualBox | 4.3.6 r91406 |
| Vagrant | 1.3.5 |
CentOS 6.5をVirtualBox 4.3.6上で作成し、Vagrant Boxを作成する。
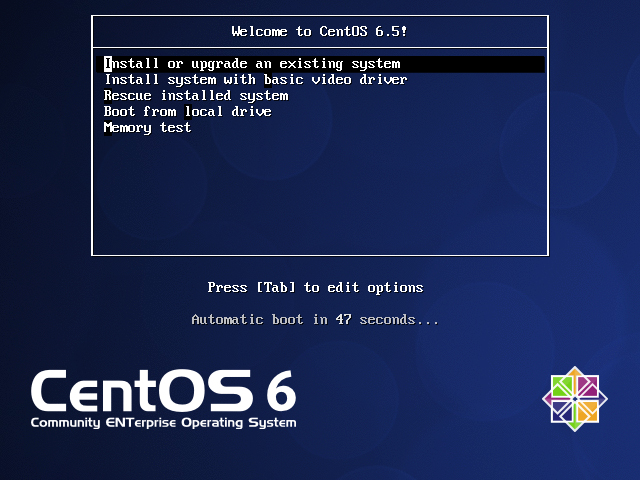
仮想マシンを作成し、CentOS-6.5-i386-minimailをインストールする。
$ VBoxManage -v
$ VBoxManage -v
4.3.6r91406

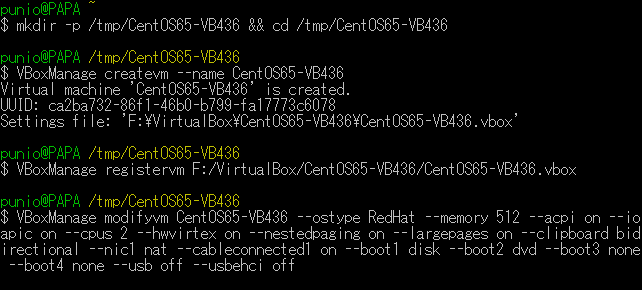
$ mkdir -p /tmp/CentOS65-VB436 && cd /tmp/CentOS65-VB436
$ VBoxManage createvm --name CentOS65-VB436
$ VBoxManage registervm F:/VirtualBox/CentOS65-VB436/CentOS65-VB436.vbox
$ VBoxManage modifyvm CentOS65-VB436 --ostype RedHat --memory 512 --acpi on --ioapic on --cpus 2 --hwvirtex on --nestedpaging on --largepages on --clipboard bidirectional --nic1 nat --cableconnected1 on --boot1 disk --boot2 dvd --boot3 none --boot4 none --usb off --usbehci off
$ VBoxManage createhd --size 8192 --variant Fixed --filename F:/VirtualBox/CentOS65-VB436/CentOS65-VB436.vdi
$ VBoxManage storagectl CentOS65-VB436 --name SATA --add sata --portcount 5 --bootable on
$ VBoxManage storageattach CentOS65-VB436 --storagectl SATA --port 1 --type hdd --medium F:/VirtualBox/CentOS65-VB436/CentOS65-VB436.vdi
$ VBoxManage storageattach CentOS65-VB436 --storagectl SATA --port 2 --type dvddrive --medium I:/ISO/CentOS/CentOS-6.5-i386-minimal.iso
$ VBoxManage startvm CentOS65-VB436
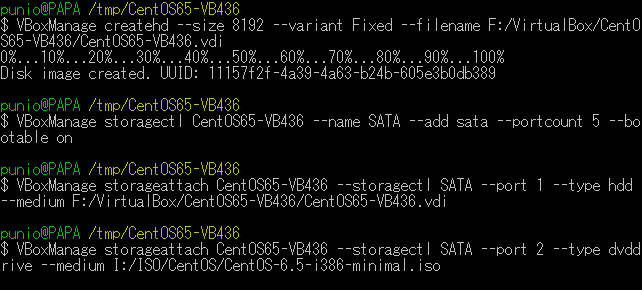
$ mkdir -p /tmp/CentOS65-VB436 && cd /tmp/CentOS65-VB436

$ VBoxManage createvm --name CentOS65-VB436
Virtual machine 'CentOS65-VB436' is created.
UUID: ca2ba732-86f1-46b0-b799-fa17773c6078
Settings file: 'F:\VirtualBox\CentOS65-VB436\CentOS65-VB436.vbox'

$ VBoxManage registervm F:/VirtualBox/CentOS65-VB436/CentOS65-VB436.vbox

$ VBoxManage modifyvm CentOS65-VB436 --ostype RedHat --memory 512 --acpi on --ioapic on --cpus 2 --hwvirtex on --nestedpaging on --largepages on --clipboard bidirectional --nic1 nat --cableconnected1 on --boot1 disk --boot2 dvd --boot3 none --boot4 none --usb off --usbehci off

$ VBoxManage createhd --size 8192 --variant Fixed --filename F:/VirtualBox/CentOS65-VB436/CentOS65-VB436.vdi
0%...10%...20%...30%...40%...50%...60%...70%...80%...90%...100%
Disk image created. UUID: 11157f2f-4a39-4a63-b24b-605e3b0db389

$ VBoxManage storagectl CentOS65-VB436 --name SATA --add sata --portcount 5 --bootable on

$ VBoxManage storageattach CentOS65-VB436 --storagectl SATA --port 1 --type hdd --medium F:/VirtualBox/CentOS65-VB436/CentOS65-VB436.vdi

$ VBoxManage storageattach CentOS65-VB436 --storagectl SATA --port 2 --type dvddrive --medium I:/ISO/CentOS/CentOS-6.5-i386-minimal.iso

$ VBoxManage startvm CentOS65-VB436
Waiting for VM "CentOS65-VB436" to power on...
VM "CentOS65-VB436" has been successfully started.
 |  |
 |  |
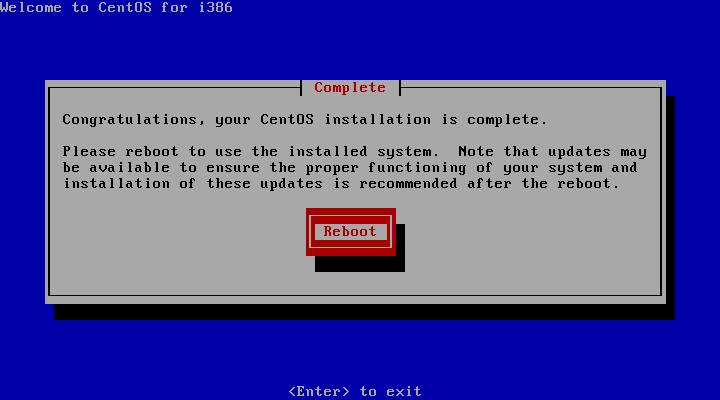 |  |
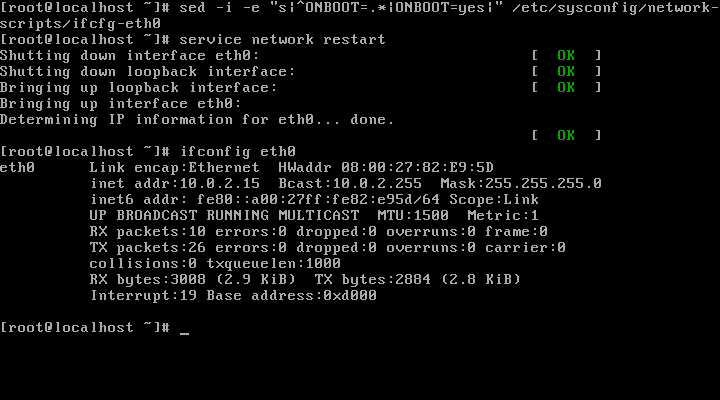
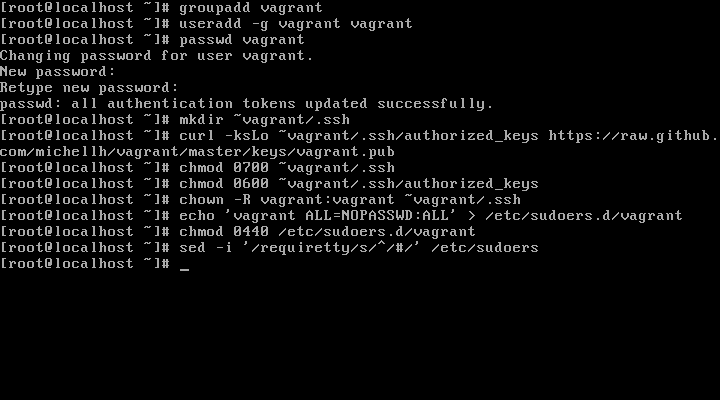
インストールしたばかりのCentOSは、ネットワークも有効になっていませんので、ネットワークを有効化し、vagrantユーザを作成します。
# sed -i -e "s|^ONBOOT=.*|ONBOOT=yes|" /etc/sysconfig/network-scripts/ifcfg-eth0
# service network restart
# ifconfig eth0
# groupadd vagrant
# useradd -g vagrant vagrant
# passwd vagrant
# mkdir -p ~vagrant/.ssh
# curl -ksLo ~vagrant/.ssh/authorized_keys https://raw.github.com/mitchellh/vagrant/master/keys/vagrant.pub
# chmod 0700 ~vagrant/.ssh
# chmod 0600 ~vagrant/.ssh/authorized_keys
# chown -R vagrant:vagrant ~vagrant/.ssh
# echo 'vagrant ALL=NOPASSWD:ALL' > /etc/sudoers.d/vagrant
# chmod 0440 /etc/sudoers.d/vagrant
# sed -i '/requiretty/s/^/#/' /etc/sudoers
 |  |
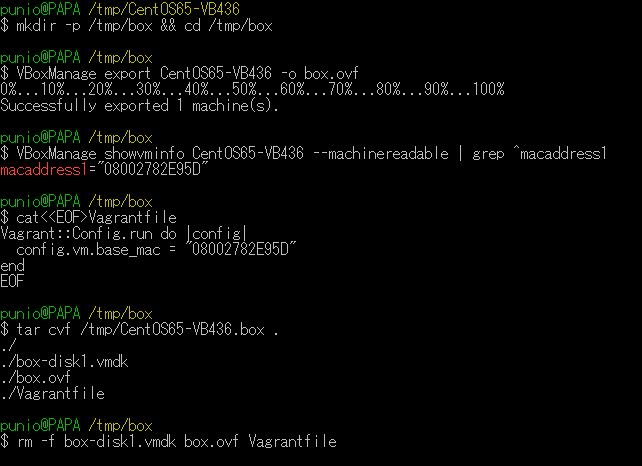
仮想マシンをシャットダウン後、Vagrant Boxを作成します。
$ mkdir -p /tmp/box && cd /tmp/box
$ VBoxManage export CentOS65-VB436 -o box.ovf
$ VBoxManage showvminfo CentOS65-VB436 --machinereadable | grep ^macaddress1
$ cat<<EOF>Vagrantfile
Vagrant::Config.run do |config|
  config.vm.base_mac = "08002782E95D"
end
EOF
$ tar cvf /tmp/CentOS65-VB436.box .
$ rm -f box-disk1.vmdk box.ovf Vagrantfile
$ mkdir -p /tmp/box && cd /tmp/box

$ VBoxManage export CentOS65-VB436 -o box.ovf
0%...10%...20%...30%...40%...50%...60%...70%...80%...90%...100%
Successfully exported 1 machine(s).

$ VBoxManage showvminfo CentOS65-VB436 --machinereadable | grep ^macaddress1
macaddress1="08002782E95D"

$ cat<<EOF>Vagrantfile
> Vagrant::Config.run do |config|
>   config.vm.base_mac = "08002782E95D"
> end
> EOF

$ tar cvf /tmp/CentOS65-VB436.box .
./
./box-disk1.vmdk
./box.ovf
./Vagrantfile

$ rm -f box-disk1.vmdk box.ovf Vagrantfile
以上で、VirtualBoxゲストアドインがインストールされていないBoxが作成できました。
Vagrant Boxを作成しましたので、Boxを起動してゲストアドインをインストールします。
ゲストアドインのインストールには、vagrant-vbguestプラグインを使用しますので、Vagrantにお勧めしたいプラグインを参考に、プラグインをインストールしておいて下さい。
$ cd /tmp/CentOS65-VB436
$ vi Vagrantfile
VAGRANTFILE_API_VERSION = "2"

Vagrant.configure(VAGRANTFILE_API_VERSION) do |config|
  # BOX名
  config.vm.box = "CentOS65-VB436"

  # BOXのダウンロードURL
  config.vm.box_url = "file://d:/temp/CentOS65-VB436.box"
end
$ vagrant up
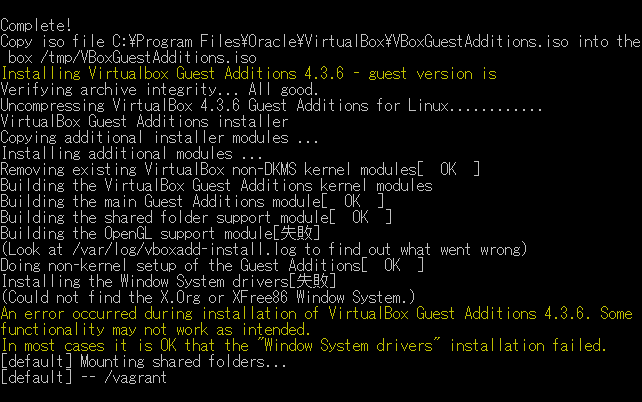
起動すると、22行目でゲストアドインが見つからないと表示され、ゲストアドインのインストールが始まります。
Bringing machine 'default' up with 'virtualbox' provider...
[default] Box 'CentOS65-VB436' was not found. Fetching box from specified URL for
the provider 'virtualbox'. Note that if the URL does not have
a box for this provider, you should interrupt Vagrant now and add
the box yourself. Otherwise Vagrant will attempt to download the
full box prior to discovering this error.
Downloading or copying the box...
Extracting box...ate: 107M/s, Estimated time remaining: --:--:--)
Successfully added box 'CentOS65-VB436' with provider 'virtualbox'!
[default] Importing base box 'CentOS65-VB436'...
[default] Matching MAC address for NAT networking...
[default] Setting the name of the VM...
[default] Clearing any previously set forwarded ports...
[default] Creating shared folders metadata...
[default] Clearing any previously set network interfaces...
[default] Preparing network interfaces based on configuration...
[default] Forwarding ports...
[default] -- 22 => 2222 (adapter 1)
[default] Booting VM...
[default] Waiting for machine to boot. This may take a few minutes...
[default] Machine booted and ready!
No installation found.
Loaded plugins: fastestmirror
Setting up Install Process
Copy iso file C:\Program Files\Oracle\VirtualBox\VBoxGuestAdditions.iso into the box /tmp/VBoxGuestAdditions.iso
Installing Virtualbox Guest Additions 4.3.6 - guest version is
Verifying archive integrity... All good.
Uncompressing VirtualBox 4.3.6 Guest Additions for Linux............
VirtualBox Guest Additions installer
Copying additional installer modules ...
Installing additional modules ...
Removing existing VirtualBox non-DKMS kernel modules[  OK  ]
Building the VirtualBox Guest Additions kernel modules
Building the main Guest Additions module[  OK  ]
Building the shared folder support module[  OK  ]
Building the OpenGL support module[失敗]
(Look at /var/log/vboxadd-install.log to find out what went wrong)
Doing non-kernel setup of the Guest Additions[  OK  ]
Installing the Window System drivers[失敗]
(Could not find the X.Org or XFree86 Window System.)
An error occurred during installation of VirtualBox Guest Additions 4.3.6. Some functionality may not work as intended.
In most cases it is OK that the "Window System drivers" installation failed.
[default] Mounting shared folders...
[default] -- /vagrant
 |  |
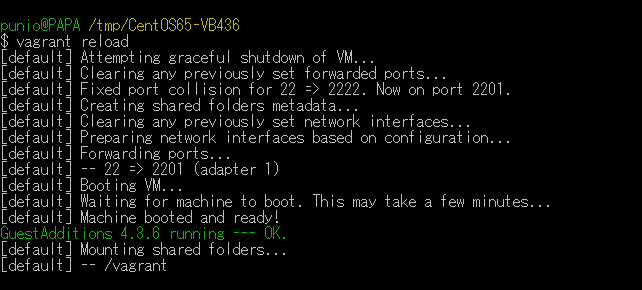
reloadコマンドで、Boxを再起動するとゲストアドインのバージョンが、4.3.6であることが確認できます。
$ vagrant reload
[default] Attempting graceful shutdown of VM...
[default] Clearing any previously set forwarded ports...
[default] Fixed port collision for 22 => 2222. Now on port 2201.
[default] Creating shared folders metadata...
[default] Clearing any previously set network interfaces...
[default] Preparing network interfaces based on configuration...
[default] Forwarding ports...
[default] -- 22 => 2201 (adapter 1)
[default] Booting VM...
[default] Waiting for machine to boot. This may take a few minutes...
[default] Machine booted and ready!
GuestAdditions 4.3.6 running --- OK.
[default] Mounting shared folders...
[default] -- /vagrant
ここまでの作業で、ゲストアドインのインストールが成功したように見えますが、Box起動時のブート画面を見ると、OpenGL support moduleのビルドに失敗しています。
Installing additional modules ...
Removing existing VirtualBox non-DKMS kernel modules[  OK  ]
Building the VirtualBox Guest Additions kernel modules
Building the main Guest Additions module[  OK  ]
Building the shared folder support module[  OK  ]
Building the OpenGL support module[失敗]
(Look at /var/log/vboxadd-install.log to find out what went wrong)
Doing non-kernel setup of the Guest Additions[  OK  ]
Installing the Window System drivers[失敗]
X-Window Systemを導入していないため、Windows System driverの失敗は、当たり前なので問題無いのですが、OpenGLモジュールのビルドの失敗は、これまでありませんでしたので、そのままにしておくと大変な目に遭います。
私も最初は素通りしていたのですが、CentOSのさまざまなBoxを作成するうちに、メインモジュールのビルドが失敗するようになり、Box起動に時間が掛かるようになって初めて、Box起動のたびに毎回アドインのビルドが行われていることにて気づいた経験があります。
ですから、OpenGLモジュールの失敗の対処を最初にしておくと、その後ハマることは無いと思います。
というワケで、OpenGLモジュールのビルドが失敗しないための対処を行ったBoxを作成します。
VirtualBoxのバージョンと同じゲストアドインのISOイメージをBoxに割り当てます。
$ VBoxManage storageattach `cat .vagrant/machines/default/virtualbox/id` --storagectl SATA --port 2 --type dvddrive --medium I:/ISO/VirtualBox/VBoxGuestAdditions_4.3.6.iso

Boxに接続し、カーネルソースに必要なヘッダファイルをシンボリックリンクで作成します。
$ cd /usr/src/kernels/`uname -r`/include/drm
$ sudo ln -s /usr/include/drm/drm.h .
$ sudo ln -s /usr/include/drm/drm_sarea.h .
$ sudo ln -s /usr/include/drm/drm_mode.h .
$ sudo ln -s /usr/include/drm/drm_fourcc.h .

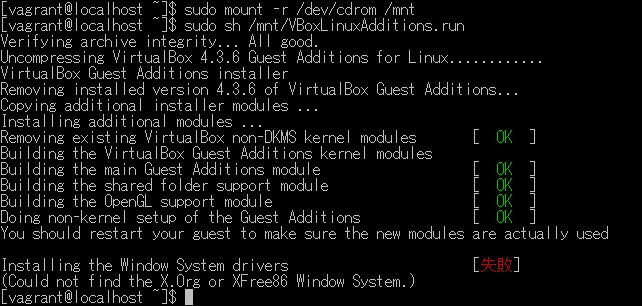
ゲストアドインのISOイメージをマウントして、ゲストアドインを再インストールすると、OpenGLモジュールのビルドが成功します。
$ sudo mount -r /dev/cdrom /mnt
$ sudo sh /mnt/VBoxLinuxAdditions.run
Verifying archive integrity... All good.
Uncompressing VirtualBox 4.3.6 Guest Additions for Linux............
VirtualBox Guest Additions installer
Removing installed version 4.3.6 of VirtualBox Guest Additions...
Copying additional installer modules ...
Installing additional modules ...
Removing existing VirtualBox non-DKMS kernel modules       [  OK  ]
Building the VirtualBox Guest Additions kernel modules
Building the main Guest Additions module                   [  OK  ]
Building the shared folder support module                  [  OK  ]
Building the OpenGL support module                         [  OK  ]
Doing non-kernel setup of the Guest Additions              [  OK  ]
You should restart your guest to make sure the new modules are actually used

Installing the Window System drivers                       [失敗]
(Could not find the X.Org or XFree86 Window System.)
Boxを停止し、VagrantでカスタマイズしたBoxをパッケージ化するを参考にして、再パッケージ化します。
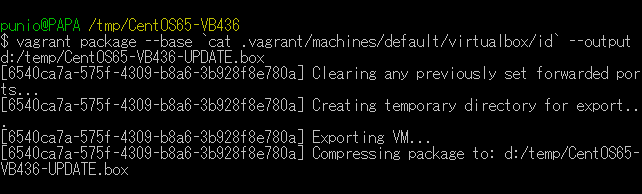
$ vagrant package --base `cat .vagrant/machines/default/virtualbox/id` --output d:/temp/CentOS65-VB436-UPDATE.box
[6540ca7a-575f-4309-b8a6-3b928f8e780a] Clearing any previously set forwarded ports...
[6540ca7a-575f-4309-b8a6-3b928f8e780a] Creating temporary directory for export...
[6540ca7a-575f-4309-b8a6-3b928f8e780a] Exporting VM...
[6540ca7a-575f-4309-b8a6-3b928f8e780a] Compressing package to: d:/temp/CentOS65-VB436-UPDATE.box
CentOS 6.5のBoxにゲストアドインをインストールする際に、OpenGLモジュールのエラーが発生した場合や、VirtualBoxのバージョンを上げた場合には、カーネルソースの設定変更を行うことによって、ビルドエラーを回避することができます。